How Metal Roof Repairs Work: Step-by-Step Explained
Metal roof repairs are a structured process designed to identify, diagnose, and fix issues that affect the performance and lifespan of a roofing system. While metal roofs are highly durable and long-lasting, they are still exposed to harsh weather conditions, thermal expansion, corrosion, and physical damage over time. Understanding how metal roof repairs work step-by-step can help homeowners make informed decisions, communicate effectively with roofing professionals, and maintain their roof in optimal condition. This guide breaks down the entire repair process in a clear, beginner-friendly way.
Understanding the Metal Roof Repair Process
Metal roof repair is not a single action but a sequence of steps that ensure the root cause of the problem is properly addressed. Unlike quick fixes, professional repairs involve inspection, diagnosis, preparation, repair execution, and final sealing or coating. Each stage is important to ensure long-term durability and prevent recurring issues.
Why a Step-by-Step Approach Matters
A structured repair process ensures that no hidden damage is missed. Metal roofs often have multiple layers, including fasteners, sealants, insulation, and panels. A step-by-step approach allows roofers to assess all components and deliver a complete repair rather than a temporary fix.
Step 1: Roof Inspection and Assessment
The first and most important step in metal roof repairs is a thorough inspection. This helps identify visible and hidden issues that may be affecting the roof’s performance.
Visual Inspection of the Roof Surface
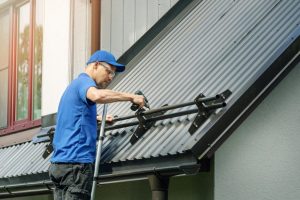
Roofers begin by checking the surface for obvious signs of damage such as rust spots, dents, loose panels, and missing fasteners. They also inspect seams, ridges, and flashing areas where leaks commonly occur.
Interior Leak Detection
Inside the building, professionals look for water stains, mould growth, or damp insulation. These signs help trace leaks back to their source on the roof.
Advanced Leak Testing Methods
In more complex cases, water testing or infrared scanning may be used to detect hidden moisture pockets beneath the roofing system.
Step 2: Identifying the Root Cause of Damage
Once the inspection is complete, the next step is diagnosing the root cause of the issue. This is critical because repairing only the visible damage without addressing the underlying cause can lead to repeated failures.
Common Root Causes
- Thermal expansion and contraction causing fastener loosening
- Worn or deteriorated sealants
- Improper installation or poor workmanship
- Storm or hail damage
- Corrosion due to moisture exposure
Importance of Accurate Diagnosis
Correct diagnosis ensures that repairs target the actual problem rather than temporary symptoms. For example, a leak near a seam may be caused by nearby fastener failure rather than the seam itself.
Step 3: Preparing the Roof for Repair
Before any repair work begins, the roof must be properly prepared. This ensures safety, improves repair quality, and allows materials to adhere correctly.
Cleaning the Surface
The affected area is cleaned to remove dirt, debris, rust, and old sealant. A clean surface ensures proper adhesion of repair materials such as coatings or sealants.
Removing Damaged Materials
Any severely damaged fasteners, flashing, or panels are carefully removed. This step ensures that only structurally sound components remain in place.
Ensuring Safety Measures
Roofers set up safety harnesses, ladders, and fall protection systems before beginning repair work, especially on steep or high roofs.
Step 4: Performing the Actual Repairs
This is the core stage of the process where identified problems are physically repaired using appropriate methods and materials.
Sealing Small Cracks and Leaks
Roofing-grade sealants or tapes are applied to small cracks, seams, or gaps. These materials create a waterproof barrier that prevents further leakage.
Replacing Fasteners
Loose or corroded screws are replaced with new fasteners, often fitted with rubber washers to improve sealing and flexibility during temperature changes.
Panel Repair or Replacement
If a metal panel is severely damaged, it may be repaired or fully replaced. Replacement involves carefully removing the damaged section and installing a new panel that matches the existing roof.
Flashing Repair
Flashing around chimneys, skylights, and vents is often a common source of leaks. Damaged flashing is repaired or replaced to ensure proper water diversion.
Rust Treatment
Rusty areas are cleaned using abrasive tools, treated with anti-corrosion primers, and sealed with protective coatings to prevent further oxidation.
Step 5: Applying Protective Coatings
After structural repairs are completed, protective coatings are often applied to enhance durability and weather resistance.
Types of Metal Roof Coatings
- Acrylic coatings for UV protection and reflectivity
- Silicone coatings for superior waterproofing
- Polyurethane coatings for high durability and impact resistance
Benefits of Roof Coating
Coatings help extend roof lifespan, improve energy efficiency, and reduce the risk of future corrosion or leaks by creating a seamless protective layer.
Step 6: Final Inspection and Quality Check
Once repairs are complete, a final inspection ensures that all issues have been properly addressed and the roof is fully restored.
Checking Repair Integrity
Roofers verify that all sealants are properly applied, fasteners are secure, and replaced panels are correctly installed.
Water Testing if Needed
In some cases, controlled water testing is conducted to confirm that leaks have been fully resolved.
Cleanup and Site Restoration
All debris, old materials, and tools are removed from the site, leaving the property clean and safe.
Step 7: Preventative Maintenance Recommendations
After repairs are completed, homeowners are usually given maintenance advice to prevent future issues and extend the lifespan of their metal roof.
Regular Inspections
It is recommended to inspect metal roofs at least twice a year and after severe weather events to detect early signs of damage.
Cleaning and Debris Removal
Keeping the roof clean prevents moisture buildup, rust formation, and drainage blockages that can lead to leaks.
Monitoring Sealants and Fasteners
Sealants and fasteners should be checked regularly for wear and replaced when necessary to maintain a watertight system.
Common Mistakes in Metal Roof Repairs
Understanding common mistakes helps homeowners avoid poor repair outcomes and unnecessary expenses.
Ignoring Small Leaks
Small leaks can quickly escalate into major structural damage if left untreated.
Using Incorrect Materials
Using non-compatible sealants or fasteners can lead to premature failure of repairs.
Skipping Root Cause Analysis
Repairing visible damage without addressing the underlying cause often results in recurring problems.
Conclusion
Metal roof repairs follow a clear and systematic process that ensures both visible and hidden issues are properly addressed. From inspection and diagnosis to repair execution and final sealing, each step plays a crucial role in restoring the roof’s integrity. By understanding how metal roof repairs work step-by-step, homeowners can better maintain their roofs, identify problems early, and ensure long-term durability. Whether handled professionally or as part of routine maintenance, following the correct process is essential for keeping a metal roof strong, efficient, and weather-resistant for years to come.