
How to Install a Polycarbonate Roof: Step-by-Step Guide
Installing a polycarbonate roof is one of the most effective ways to create a lightweight, durable, and naturally bright outdoor space. Whether you’re covering a patio, pergola, greenhouse, carport, or walkway, polycarbonate roofing sheets offer excellent UV protection, impact resistance, and weather durability. This step-by-step guide explains exactly how to install a polycarbonate roof correctly, safely, and in a way that maximises its lifespan.
What Is a Polycarbonate Roof?
Polycarbonate roofing is made from a strong thermoplastic material designed to withstand harsh weather conditions while allowing natural light to pass through. It is commonly used as an alternative to glass or metal roofing due to its strength, flexibility, and affordability.
Key Benefits of Polycarbonate Roofing
High impact resistance (virtually shatterproof)
Lightweight and easy to handle
UV protection to reduce heat and sun damage
Excellent light transmission
Suitable for DIY installation
Understanding these benefits helps you appreciate why proper installation is essential to maximise performance and longevity.
Tools and Materials You Will Need
Before starting your polycarbonate roof installation, gather all necessary tools and materials to ensure a smooth process.
Essential Tools
Tape measure
Circular saw or fine-tooth saw
Drill and screwdriver
Ladder or scaffolding
Spirit level
Safety gloves and goggles
Silicone sealant gun
Required Materials
Polycarbonate roofing sheets
Aluminium or polycarbonate glazing bars
End caps and sealing tape
Screws with rubber washers
Flashing (if attaching to a wall)
Support frame (timber or metal structure)
Having everything prepared before installation reduces delays and mistakes.
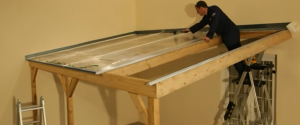
Step 1: Plan and Measure the Roof Area
Accurate planning is critical when installing a polycarbonate roof.
Measure the Structure
Measure the length, width, and slope of your roof frame. Ensure the structure has a minimum pitch of 5–10 degrees to allow water runoff and prevent pooling.
Check Structural Support
Ensure your frame can support the roofing system. While polycarbonate is lightweight, the frame must still handle wind loads, rain, and potential debris.
Plan Sheet Layout
Decide how the sheets will be positioned. Polycarbonate sheets typically come in standard widths, so planning reduces unnecessary cutting and waste.
Step 2: Prepare the Roof Frame
A properly prepared frame ensures stability and prevents future issues.
Clean and Level the Frame
Make sure the frame is clean, dry, and level. Remove any sharp edges or protruding nails that could damage the sheets.
Install Glazing Bars
Fix aluminium or polycarbonate glazing bars along the rafters. These will hold the sheets in place and provide structural support.
Ensure Proper Spacing
Spacing between supports should match the manufacturer’s recommendations, typically around 700mm to 1000mm depending on sheet thickness.
Step 3: Cut Polycarbonate Sheets to Size
Cutting must be done carefully to avoid cracking or damaging the sheets.
Use the Right Cutting Tool
A circular saw with a fine-tooth blade or jigsaw works best. Always cut slowly and steadily.
Secure the Sheet Before Cutting
Clamp the sheet securely to prevent vibration or movement during cutting.
Protect the Surface
Keep the protective film on the sheet while cutting to avoid scratches. Only remove it after installation is complete.
Step 4: Seal the Sheet Edges
Proper sealing prevents dirt, moisture, and insects from entering the panels.
Use Anti-Dust Tape
Apply anti-dust tape to the top edges of the sheet to block debris.
Use Venting Tape for Bottom Edges
The bottom edge should use vented tape to allow condensation to escape while keeping contaminants out.
Install End Caps
Fit aluminium end caps for a neat finish and added protection.
Step 5: Position and Fix the Sheets
This is the most important step in the installation process.
Align the First Sheet
Start from one side of the roof. Ensure the sheet is aligned properly with the slope for correct water drainage.
Secure with Screws
Use screws with rubber washers to prevent leaks. Do not overtighten, as polycarbonate expands and contracts with temperature changes.
Allow Expansion Gaps
Leave a small gap (usually 3–5mm) between sheets to allow for thermal expansion.
Step 6: Install Subsequent Sheets
Continue installing sheets one by one, ensuring proper alignment.
Overlap Correctly
If using corrugated sheets, ensure proper overlapping as per manufacturer guidelines.
Check Alignment Frequently
Use a spirit level to ensure sheets remain straight and evenly spaced.
Seal Joints if Needed
Apply silicone sealant where necessary to improve waterproofing, especially in exposed areas.
Step 7: Install Flashing and Edging
Flashing helps protect your roof from leaks and wind uplift.
Wall Flashing Installation
If your roof is attached to a wall, install flashing to prevent water from seeping behind the structure.
Edge Trims
Fit edge trims along the sides for a clean, professional finish and added protection against wind.
Step 8: Final Inspection and Cleaning
Once installation is complete, conduct a full inspection.
Check All Fixings
Ensure all screws are tight but not over-compressed.
Inspect for Gaps
Look for any gaps or misaligned sheets that may cause leaks.
Clean the Surface
Remove protective film and clean the sheets with mild soapy water and a soft cloth. Avoid abrasive cleaners.
Maintenance Tips for Polycarbonate Roofs
Proper maintenance extends the life of your roof significantly.
Regular Cleaning
Clean your roof every 3–6 months to remove dust, leaves, and debris.
Check for Damage
Inspect for cracks, loose screws, or seal deterioration after storms.
Reapply Sealant When Needed
Over time, sealants may degrade and require reapplication to maintain waterproofing.
Common Mistakes to Avoid
Avoiding these mistakes ensures a longer-lasting and more efficient installation.
Overtightening Screws
This can cause cracking or restrict natural expansion of the material.
Incorrect Sheet Orientation
Installing sheets upside down can reduce UV protection and drainage efficiency.
Skipping Edge Sealing
Failing to seal edges leads to condensation buildup and contamination inside panels.
Conclusion
Installing a polycarbonate roof is a practical and cost-effective way to enhance outdoor spaces with natural light and durable protection. By following this step-by-step guide—from planning and preparation to installation and maintenance—you can ensure a professional-quality result that lasts for years. Proper installation not only improves performance but also protects your investment against weather damage, leaks, and premature wear.
If done correctly, a polycarbonate roof delivers a perfect balance of strength, style, and functionality for both residential and commercial applications.