
Step-by-Step Guide to Repairing Rotten Fascia Boards (Complete DIY Home Repair Guide)
Rotten fascia boards are one of the most common roofline problems homeowners face, especially in older houses or properties exposed to heavy rain and poor gutter maintenance. Left untreated, fascia rot can lead to serious structural damage, including roof leaks, soffit deterioration, and even pest infestations.
This SEO-optimised guide explains exactly how to repair rotten fascia boards step by step, what tools you’ll need, how to identify the damage early, and when it’s better to replace rather than repair.
What Are Fascia Boards and Why Do They Rot?
Fascia boards are the long, straight boards that run along the lower edge of your roof. They support the bottom row of roof tiles and hold the guttering in place. In simple terms, they act as a protective barrier between your roof and the outside elements.
Main Causes of Fascia Board Rot
Rotting fascia is usually caused by moisture exposure over time. The most common reasons include:
Blocked or overflowing gutters allowing water to seep into timber
Poor roof ventilation trapping moisture
Cracked or damaged roof tiles
Old, untreated timber fascia boards
Lack of regular maintenance or painting
When water repeatedly penetrates the wood, it weakens the structure, causing it to soften, crack, and eventually rot.
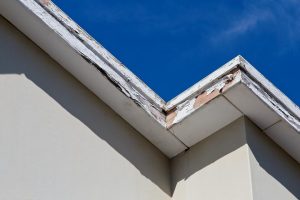
Signs You Have Rotten Fascia Boards
Before repairing fascia boards, you need to confirm that rot is present. Catching the issue early can save time and money.
Visual Warning Signs
Peeling or bubbling paint on the fascia
Dark stains or water marks
Visible cracks or holes in the timber
Sagging or uneven guttering
Physical Indicators of Damage
Soft or spongy wood when pressed
Sections breaking away easily
Presence of mould or mildew
Damp smell near roof edges
If you notice multiple signs, it’s likely the fascia needs repair or full replacement.
Tools and Materials You Will Need
Before starting the repair, gather the necessary tools to ensure a smooth process.
Essential Tools
Pry bar or flat crowbar
Hammer
Saw (hand saw or circular saw)
Drill and screws
Tape measure
Safety gloves and goggles
Ladder (stable and secure)
Materials Required
Replacement timber or uPVC fascia board
Wood filler or epoxy resin (for minor repairs)
Exterior-grade paint or sealant
Rust-resistant nails or screws
Waterproof membrane (optional for extra protection)
Step-by-Step Guide to Repairing Rotten Fascia Boards
Now that you’ve identified the problem and gathered tools, follow these steps carefully.
Step 1: Inspect the Damage Thoroughly
Start by examining the entire fascia board along the roofline. Tap the wood gently using a screwdriver or hammer handle. If it sounds hollow or breaks easily, the rot has spread.
Decide whether:
A small section can be repaired, or
The entire board needs replacing
If more than 30–40% is damaged, replacement is usually the better option.
Step 2: Remove the Gutters Safely
Before accessing the fascia, you’ll need to remove the guttering attached to it.
Carefully unscrew or detach the gutter brackets. Place them safely aside for reinstallation later. Be cautious, as gutters may still contain water or debris.
Tip: Label sections of guttering if your system is complex to make reinstallation easier.
Step 3: Remove the Rotten Fascia Board
Using a pry bar or hammer, gently remove the damaged fascia board. Work slowly to avoid damaging surrounding soffits or roof tiles.
If nails are stuck or rusted:
Use a saw to cut through difficult sections
Remove all remaining nails or screws from the rafters
Ensure the area is clean before installing new material.
Step 4: Check and Repair Underlying Structure
Once the fascia is removed, inspect the exposed rafter ends.
Look for:
Additional rot or moisture damage
Insect infestations
Weak or split timber
If damage is found, treat the wood with a fungicidal solution or replace affected rafters before proceeding.
Step 5: Measure and Cut the New Fascia Board
Measure the length of the area carefully using a tape measure. Cut your replacement fascia board to size.
Common material choices include:
Treated timber (traditional look)
uPVC fascia boards (low maintenance and weather-resistant)
Ensure all cuts are straight for a tight, professional finish.
Step 6: Install the New Fascia Board
Position the new fascia board against the rafter ends. Secure it using galvanised screws or nails to prevent rusting.
Make sure:
The board is level
Fixings are evenly spaced
Joints are tight and sealed
For longer runs, join boards neatly using angled cuts for better strength and appearance.
Step 7: Seal and Protect the Fascia
Once installed, apply a waterproof sealant or exterior paint to protect the fascia from moisture.
This step is essential for preventing future rot. Pay close attention to joints and edges where water is most likely to enter.
If using timber, consider applying:
Primer
Exterior paint (two coats recommended)
Optional weatherproof coating
Step 8: Reinstall Gutters
Once the fascia is fully secure and sealed, reinstall the guttering system.
Check:
Proper alignment for water flow
Secure bracket attachment
No leaks at joints
Ensure gutters are slightly angled to direct water toward downpipes.
When to Repair vs Replace Fascia Boards
Not all fascia damage requires full replacement. Here’s a simple guide:
Repair is suitable when:
Damage is minor or localised
Wood is still structurally sound
Moisture has not spread widely
Replacement is needed when:
Extensive rot is present
Fascia is soft across large sections
Gutter system is failing due to weak support
How to Prevent Fascia Boards from Rotting Again
Prevention is key to avoiding repeat repairs.
Maintenance Tips
Clean gutters at least twice a year
Inspect roofline annually
Repaint timber fascia every few years
Fix roof leaks immediately
Ensure proper attic ventilation
Switching to uPVC fascia boards can also significantly reduce long-term maintenance needs.
Conclusion
Repairing rotten fascia boards is a manageable DIY task if the damage is caught early and handled carefully. By following this step-by-step guide, you can restore your roofline, prevent further water damage, and extend the life of your home’s exterior structure.
However, if the damage is extensive or you are unsure about working at height, it’s always safer to consult a professional roofing specialist.
Proper maintenance and early intervention are the keys to keeping your fascia boards strong, functional, and rot-free for years to come.